For this project, we used the design Mischief Cat in the photo-stitch technique. In this project we show how to make an applique with a photo-stitch file which can be then used on many different kinds of items, including T-shirts.
|

|
You will need :
- embroidery threads according to our color card,
- water-soluble mesh stabilizer,
- organza,
- small brush (toothbrush will do),
- scissors,
- iron,
- sewing thread of a matching color.
|
Embroidery:
|
Unzip the file with the Mischief Cat design. Upload the embroidery file into the embroidery machine. Either print out or open on your computer the color card file (JPG format). Select threads according to this color card.
Make a "sandwich" of stabilizer and organza fabric: 1-2 layers of watersoluble mesh on bottom - 1 layer of organza - 1 layer of watersoluble mesh on top.
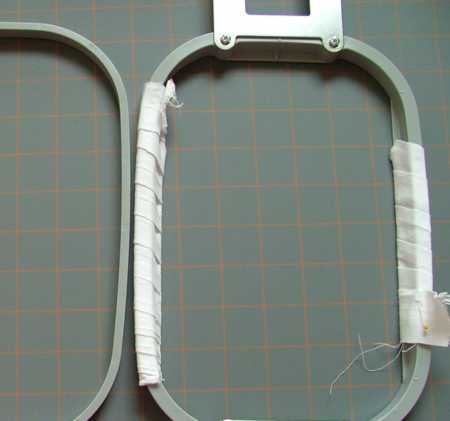
Hoop the "sandwich" very tightly. If your hoop does not hold the "sandwich" well (this often happens because stabilizer is thin and slipper), we reconmend wrapping muslin strips around the long sides of your hoop's upper frame, like you can see on the picture below.
|

|
Embroider the design.
|
 |
Cut away the excess stabilizer, but do not cut the organza. Place in a bowl with luke-warm water and let the remaining stabilizer wash out. Change the water several times.
Spread on a towel and let dry. Press.
|
Making Applique:
|
Cut away organza around the embroidery leaving 3/4" - 1" margins.
With a brush, fray the organza margins.
|

|
Place the applique on your chosen item (we used a T-shirt). Either pin or, using a temporary fabric adhesive, adhere in place.
|

|
On your sewing machine, topstitch the applique in place along the edges of the embroidery. Altenatively, you can use a permanent fusible web, such as Stitch Witchery or Steam-a-Seam2.
|

|
|
| Have fun! |
|
|
Back to Mischief Cat
|
Back to Projects Page
|
