This traditionally pieced tablerunner is decorated with embroidery. We used designs from the Hearts and Flowers Snowflake Set.
The finished size of the tablerunner is about 21" x 36 1/2".
|

|
You will need :
- embroidery threads, either polyester or rayon; select colors to match your fabric,
- about 1/2 yard each of 4 fabrics, we used navy blue, royal blue, torquoise and white, but feel free to select your own colors;
- light-weight cut-away embroidery stabilizer,
- fabric for the backing,
- batting,
- quilter's ruler,
- rotary cutter,
- iron,
- #12 universal needle,
- #12-#14 quilting needle,
- matching sewing and quilting threads,
- chalk or graph pencils.
|
Embroidery
|
You can either first make the stitch-outs and then assemble the quilt, or assemble the top and then make the embroidery. In any case, make a test stitch-out first to ensure your thread colors and machine settings are correct.
Stabilize the fabric. Hoop it tightly and embroider the designs one by one. |

|
Trim the stitch-outs to 4 1/2" x 4 1/2" squares. These will be the centers of the star blocks. We used 5 stitch-outs. If you need a longer tablerunner, you can use all 6.
We made the embroidery on navy blue fabric.
|
Cutting:
|
The top consists of 5 star blocks and 5 flying geese strips.
For each star block:
- Out of navy blue fabric, cut:
- 8 strips measuring 2 1/2" x 4 1/2"
- 8 squares measuring 2 1/2" x 2 1/2"
- Out of white or turquoise fabric, cut:
- 16 squares measuring 2 1/2" x 2 1/2"
Two of the star blocks use white fabric. Three of them use turquoise fabric.
For each flying geese strip:
- out of navy blue fabric, cut 8 squares measuring 2 1/2" x 2 1/2".
- out of white or turquoise fabric, cut 4 strips measuring 2 1/2" x 4 1/2",
Two of the strips use white fabric. Three of them use turquoise fabric.
You will also need 2 strips measuring 2 1/2" x 8 1/2, cut out of navy blue fabric.
For the borders, out of royal blue fabric, cut
- 2 strips measuring 3 1/2" x 32" and
- 2 strips measuring 3 1/2" x 22".
|
|
Flying Goose Unit:
|
| Note: seam allowance is 1/4", press the seam immediately after you make it. |
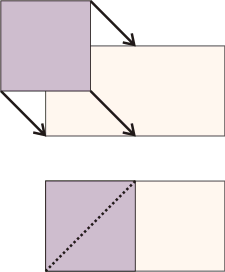
Position a 2 1/2" x 4 1/2" strip on your working table, face up. Position one of the 2 1/2" squares, face down, on the left of the rectangle. Align the sides.
With a thin graphic pencil, draw a diagonal to connect the upper right corner and the lower left corner. |

|
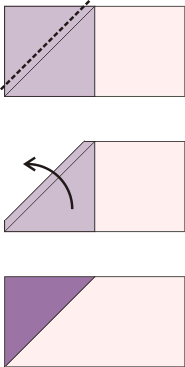
Machine stitch along the diagonal.
Cut the excess fabric, leaving 1/4" seam allowance.
Unfold the square and press |

|
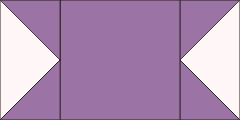
Repeat for the other side of the strip.
|

|
You need 8 white-and-navy flying geese units for the stars with white rays.
You need 12 turquoise-and-navy flying geese units for the stars with turquoise rays.
You need 8 navy-and-white flying geese units for the white flying geese strips.
You need 12 navy-and-turquoise flying geese units for the turquoise flying geese strips.
|

|
Star Block
|
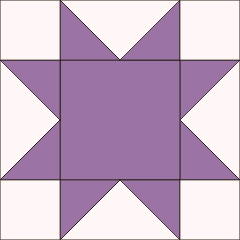
| Sew two of the "flying geese" units to the left and right edges of the embroidered block. |

|
| Take two "flying geese" strips and four 2 1/2" x 2 1/2" squares. Sew a square to each end of the "flying geese". |

|
| Sew these strips to the top and bottom edges of the central part. |

|
| Assembly of the Top |
Sew together the following parts into a long strip:
- star with white rays
- turquoise "flying geese" strip (pointed up)
- star with turquoise rays -
- turquoise "flying geese" strip (pointed up)
- star with white rays.
|

|
Sew a second strip using the following parts:
- 2 1/2" x 8 1/2" navy blue strip
- white "flying geese" strip (pointed up)
- star with turquoise rays
- turquoise" flying geese" strip (pointed up)
- star with turquoise rays
- white "flying geese" strip (pointed up)
- navy blue strip.
|

|
Sew both strips together, connecting them so that the "geese" fly towards the stars.
|

|
Sew the long borders to the long sides of the tabletopper, then sew the shorter borders to the short sides.
|
Quilting and Finishing
|
Now place the backing on a flat surface (table) face down. Cover with batting. Spread your working piece over it.
Pin all layers together.
We quilted in a free-motion style all over the quilt. |

|
| Press with heavy steam. Square the quilt. Finish the raw edges with the binding. |

|
| Have fun! |

|

|

|

|
|
|
Back to Hearts and Flowers Snowflake Set
|
Back to Projects Page
|
