For this elegant table topper, we used designs from the Heraldic Flower Motif Set.
The finished size of the quilt is about 32" x 32".
|

|

|
You will need :
- embroidery threads, either rayon or polyester of your choice,
- light-weight iron-on cut-away stabilizer,
- about 1/2 yard of light cream fabric for the borders,
- pieces of pale-colored fabrics of 5 (or more) different shades - pale green, pale pink, pale blue, pale yellow, pale salmon pink (batiks work well. You can use pieces from your stash. If you buy the fabric, 1 fat quarter of each color will be enough),
- about 1/4 yard of dark green fabric for the border and binding,
- batting
- fabric for the backing,
- quilting needles,
- quilting threads of matching colors,
- rotary cutter,
- quilter's ruler,
- chalk pencil,
- iron.
|
Cutting:
|
Out of pink and yellow fabrics, cut 2 squares measuring 5 1/2" x 5 1/2" of each fabric. 4 squares total.
|
Out of blue and salmon pink fabrics, cut 4 squares measuring 5 1/2" x 5 1/2" of each fabric. 8 squares total.
|
Out of pale green fabric, cut 2 squares measuring 5 7/8" x 5 7/8".
|
Out of cream fabric, cut:
- 2 squares measuring 5 7/8" x 5 7/8"
- for the first border,
- 4 strips measuring 2 1/2" x 20 1/2" and
- 2 squares measuring 2 7/8" x 2 7/8";
- for the second border,
- 2 squares measuring 1 7/8" x 1 7/8",
- for the third border
- 2 strips measuring 4" x 26 1/2" and
- 2 strips measuring 4" x 33 1/2",
|
Out of dark green fabric, cut
- 4 strips measuring 1 1/2" x 24 1/2",
- 2 squares measuring 2 7/8" x 2 7/8".
- 2 squares measuring 1 7/8" x 1 7/8".
Cut the remaining fabric into 2 1/2" wide strips for the binding.
|
Half Triangles:
|
| Note: seam allowance is 1/4". press each seam after you make it. |
For this quilt, you'll need
- 4 pale green and cream half triangles measuring 5 1/2" x 5 1/2",
- 4 dark green and cream half triangles measuring 2 1/2" x 2 1/2" and
- 4 dark green and cream half triangles measuring 1 1/2" x 1 1/2".
All half triangles are made in the same way, described below.
|
|
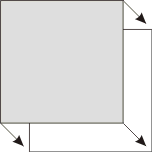
To sew half-triangle squares, take your 2 fabric squares and position them face to face. For the 5 1/2" half triangles, you will need the 5 7/8" squares. For the 2 1/2" half triangles, you will need the 2 7/8" squares. For the 1 1/2" half triangles, you will be using the 1 7/8" squares.
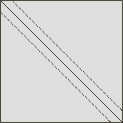
With a pencil, draw a diagonal across the top square. Stitch 1/4" from the pencil line on both sides.
|

|

|
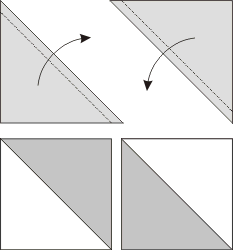
| Cut along the line. Open the new squares. Press the seam towards the darker color. Trim the "ears". Repeat for all the fabric squares. You should get 4 two-color squares, measuring 5 1/2" x 5 1/2", 4 squares measuring 2 1/2" x 2 1/2" and 4 squares measuring 1 1/2" x 1 1/2". |

|
Assembly of the Top:
|
The central part of the quilt consists of 4 rows, each consisting of 4 squares measuring 5 1/2" x 5 1/2". First lay out the squares on your working table or designer wall. Next sew the rows. Finally, sew the rows together.
Row 1: half triangle square (green triangle on bottom right) - blue square - salmon square - half triangle square (green triangle on bottom left).
Row 2: blue square - yellow square - pink square - salmon square,
Row 3: salmon square - pink square - yellow square - blue square,
Row 4: half triangle square (green triangle on top right) - salmon square - blue square - half triangle (green triangle on top left). |

|

|
| Sew two of the 2 1/2" x 20 1/2" cream strips to the right and left edges of the central part. |

|
| Sew the 2 1/2" half triangles to the ends of the remaining two 2 1/2" x 20 1/2" strips, with cream triangles against the strip. |

|
| Sew these strips to the upper and lower edges of the central piece. |

|
| Sew 2 of the green 1 1/2" x 24 1/2" strips to the left and right edges of the working piece. |

|
| Sew the 1 1/2" half triangle squares to the ends of the remaining 2 green strips, green triangles against the green strip. |

|
| Sew the strips to the upper and lower edges of the quilt top. |

|
| Lastly, attach the the cream borders. First sew the 4" x 26 1/2" strips to the left and right edges, then the 4" x 33 1/2" strips to the upper and lower edges. |

|
| Embroidery: |
Open the embroidery files from the Heraldic Flower Motif Set on your computer.
There are 6 flowers in the set, but you'll need 8, so choose 2 flowers which you'd like to embroider twice. Print out 8 templates and cut them out. If you do not have a pritner, make 8 paper templates by making circles with a diameter of 5" and cutting them out.
Lay the templates out in a loose circle on the central part of the quilt. Pin. |
| Upload the files into the machine and embroider them one by one. You can follow our color card or feel free to choose your own colors. |

|
| Quilting and Finishing: |
Now place the backing on a flat surface (table) face down. Cover with batting. Spread your working piece over it.
Pin all layers together with 1" pins and start quilting. We quilted the central part with a free motion stippling pattern, then with fancy free motion patterns all over the top. |

|
| After the quilting is finished, press the work with heavy steam and square the work -- all corners should be 90 degrees and opposite sides should be of the same length. |

|
| Finish the raw edges with the binding. That's it, the quilt is done! |

|
| Enjoy! |
|
|
Back to Heraldic Flower Motif Set
|
Back to Projects Page
|
