For this eye-catching Celtic-themed tote bag, we used the design Celtic Applique Motif for the commercial size hoop (8" x 12").
The finished size of the bag is about 15" (wide) x 15" (high) x 4" (deep).
We made the bag red and black, but you can use any color combination. Green and brown or gold and green would work great!

You will need :
Embroidery:
Cut 2 pieces of black fabric large enough to be hooped, but not less than 22"-23" long. Stabilize them with light-weight iron-on cut-away stabilizer. Working with each piece at a time, hoop it tightly.
Upload the embroidery file of the Celtic Applique Motif into the machine and embroider it on each of the pieces.
Trim each stitch-out along the wider side of the embroidery, leaving 1/2" margins.
Place the stitch-outs face to face, try to align the applique outlines as precise as possible. Stitch along the trimmed side with seam allowance 1/4". Press the seam open.
Trim the piece to 12 1/2" wide and 20 1/2" long.

The Front Panel:
Out of the patterned fabric, cut 2 strips measuring 6" x 20 1/2".
Sew them to the left and right sides of the embroidered panel. Seam allowance is 1/4".

The Back Panel:
Out of the black fabric, cut 3 strips measuring 3 1/2" x 20 1/2".
Out of the patterned fabric, cut

Quilting:
Out of batting and black fabric, cut 2 pieces each measuring about 22" x 25".
Make 2 "sandwiches" with the two bag panels: backing - batting - bag panel. Pin all layers together with 1" pins and quilt in a free motion style.
After the quilting is finished, press the work with heavy steam and square the work -- all corners should be 90 degrees and opposite sides should be of the same length.
Check and trim, if needed, to make the panels of the same size.
In the lower corners of both panels draw 2 1/2" squares and cut them out.


Zig-zag or serge the raw edges of the panels to finish them.
Pocket:
Out of black fabric, cut a piece measuring 12 1/2" x 11 1/2". Fold it right side inwards, widthwise. Align the edges and stitch the short sides together.
Turn right side out. Press.
Fold the open side 1/2" inside, press. Topstitch to close.
Position on the wrong side of the back panel about 6 1/2" from the upper edge and equal distance from the side edges. Pin.

Topstitch along 3 sides of the pocket, 1/8" - 1/4" from the edge.

With the chalk pencil and the ruler, draw a vertical line to divide the pocket into 2 compartments.

Topstitch along the line.

Handles:
Out of black fabric, cut 2 strips measuring 2 1/2" x 30".
Out of interfacing, cut 2 strips measuring 1" x 30"
Out of patterned fabric, cut 2 strips measuring 1 1/2" x 30".
Position the interfacing strips with adhesive side down, along the central line of the black strips. Press to adhere to the fabric.

Fold the long sides onto the stabilizer. Press.
Fold the long edges of the patterned strips to the central line. Press.

Position the strips in pairs, with wrong sides together. Please note that red strips are narrower than the black ones, so you'll have black margins around the red strips. Pin. Topstitch along the edges.


Finish the short edges with zig-zag or a serger.
Assembly of the Bag:
Position the panels face to face, align all edges. Sew along the bottom edge, seam allowance 1/2".
Open and press the seam. Topstitch 1/4" on both sides of the seam.
Fold the upper edges of both panels 2" backand press them firmly.

Unfold the edges. Fold the bag with right side inwards. Align the side edges. Pin.
First stitch one side, seam allowance 1/2". Open the seam and press.
Repeat for the other side.

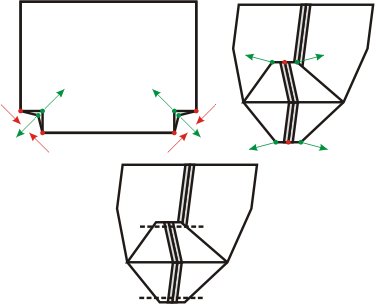
To shape the bottom, pinch the corners as shown in the diagram below. Align the bottom and the side seams. Pin. Stitch them closed.


Pin the handles to the upper edges of the panels 6 1/2" from the side seams.


Topstitch 1/4" from the edges and 2" from the edges.

Attach the magnetic snap between the handles. The female part should attach to the front panel and the male part to the back panel.

Fold the upper edges back and topstitch 1/4" from the folded edge.
Your tote bag is done.

Enjoy!
