This matching set of cinch sack and sweatshirt was made using designs from the Little Ballerina Set. All the designs fit a 5" x 7" size hoop.
The finished size of the bag is about 15" x 15".

You will need :
The Sweatshirt:
Stabilize the front of the sweatshirt with light-weight cut-away stabilizer. Hoop it tightly.
Upload the embroidery file of your choice from the Little Ballerina Set into the machine and embroider it.

After the embroidery is done, cut away the excess stabilizer, press the stitch-out and the sweatshirt around it.
Basically you're done. You can further add small embellishments. We tried some small buttons, but then decided on hot-fix crystals.


The Drawstring Bag
Fold the 16" x 33" white canvas piece in half widthwise and lightly press to mark the bottom line.
Finish the long sides of the piece with a serger or zig-zag stitch.

To make the drawstring casing:
Fold one of the short edges 1/2" back and press it heavily.
Fold again, this time 1", and press again.
Repeat for the other short edge. Do not sew for now

Mark the position of the embroidery. Stabilize the spot with medium-weight cut-away stabilizer and embroider the design of your choice. We chose the "grand jete" ballerina. Using the text function in our machine, we added the text "Little Ballerina". However, this would be the perfect spot to embroider the name of your little ballerina!

To form the drawstring casing, fold the short edges along the pressed lines and topstitch in place. You can further decorate the seam with ric-rac trim.
To make the bottom loops for the drawstring / straps:
Cut the grosgrain ribbon strip in half to get 2 pieces 2 1/2"-3" long.
Fold each piece in half widthwise and press.
Pin both loops along the bottom line on the face side of the bag, loops looking inside and short ends outside.

Fold the bag along the bottom line, face inwards. Align and pin the sides.

Stitch one side, starting from the seam line on the top edge. Seam allowance is 1/2".
Step 1/8" from the seam to the edge and stitch again.
Repeat for the other side.

Turn the working piece right side out.
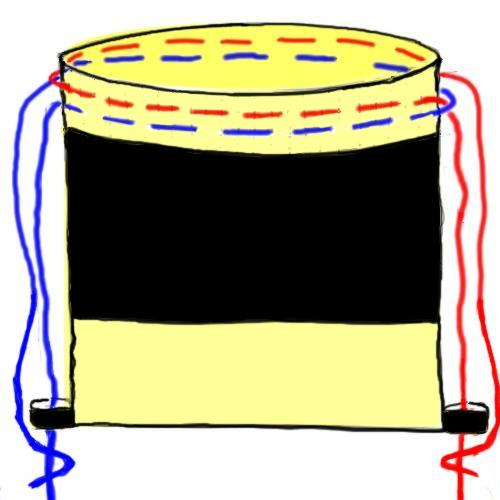
Insert the cord as shown on the diagram below:


Tie the ends.

Enjoy!