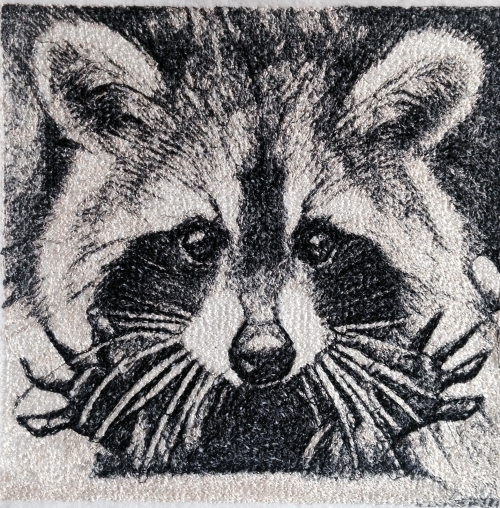
This cute, easy quilt is perfect for the Fall season. We used the design of the Raccoon for the commercial size hoop (8" x 12") and Freestanding Autumn Leves for the small hoop (4" x 4").
The finished size of the quilt is about 16" x 20". You can make the quilt larger or smaller, depending on the width of the borders around the embroidery.
|

Click to enlarge
|
|
You will need:
- embroidery threads according to the JPG color card included with the design,
- medium-weight iron-on cut-away stabilizer,
- a piece of white quilt cotton fabric for embroidery (about a fat quarter, 18" x 22)",
- pieces of fabrics from your stash featuring a leaf pattern (it can be one, or two, or more fabrics),
- medium- to heavy-weight water soluble stabilizer,
- #14 and #16 quilting needles
- quilting threads of matching colors,
- rotary cutter,
- quilter's ruler,
- any additional nature-looking embellishments (optional),
- iron.
|
Embroidery:
|
Stabilize the center of the white piece of fabric with medium-weight iron-on cut-away stabilizer. Hoop it tightly.
Print out the color card, select threads by the color card, (not by the screen of your machine!)
Upload the embroidery file of the Raccoon into the machine. Check that the stitch count on the machine is correct! It should be 89,720. Embroider the file.
|
After the embroidery is done, press the stitch-out and the fabric around it.
|

|
Trim the fabric around the stitch-out leaving 1/4" margins for seam allowance.
|
| For the Freestanding Autumn Leves you will need water-soluble stabilizer. Upload the files into the machine. You will need a bunch of leaves, so embroider a good number of them. We ended up using 33 in our quilt. |
| Wash away the stabilizer and leave the stitch-outs to air dry. |
Making the Wall Hanging:
|
Out of selected fabrics, cut 2 pieces measuring 8" x 6 1/2"-7". Sew them to the left and right edges of the stitch-out. Trim fabric edges which protrude over the stitch-out.
Out of selected fabrics cut 2 strips measuring 4 1/2" wide and the length of the width of your working piece. For us, it was about 4 1/2"-5" x 20 1/2". Please note that because this is an art quilt, we didn't bother to make the borders exactly even. Whether you want to or not is a personal preference.
|

|
| Quilting and Finishing: |
Now place the backing on a flat surface (table) face down. Cover with batting. Spread your working piece over it.
Pin all layers together with 1" pins and start quilting. We quilted with a free motion meandering pattern. |

|
| After the quilting is finished, press the work with heavy steam and square the work -- all corners should be 90 degrees and opposite sides should be of the same length. Finish the raw edges with the binding. |
Pin the leaves onto the quilt, starting from the central stitch-out. The leaves can overlap each other and protrude beyond the quilt borders.
|

|
| When you are satisfied with the arrangement, stitch the leaves to the quilt along their "veins". |

|
| Enjoy! |

|
|
Back to Raccoon and Freestanding Autumn Leves
|
Back to Projects Page
|
