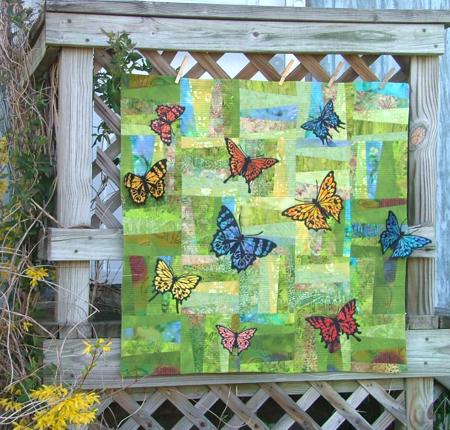
The Summer Meadow Art Quilt is simple to piece and is a great project for using up your fabric scraps. The end result is gorgeous. The quilt features the applique designs from the Butterfly Set for a large (5" x 7") and mega (6" x 10") hoops.
The finished size of the quilt is about 34" x 34" .

For the body of the quilt you will need scraps of different green fabrics. Each scrap piece should be no smaller than 2" x 7 1/2". If you do not have this many scraps, you can use 5-10 green fabrics of different hues and different patterns. With 5 fabrics, you will need about a fat quarter of each fabric.
You will also need batting and about 2 1/2 yards of fabric for the backing and binding.
For the embroidery you will need bright fabrics in different colors for the applique, light-weight cut-away stabilizer and embroidery threads.
Cut the green fabrics into 25 rectangles measuring 7 1/2" x 9 1/2". If some of your scraps are smaller than this, you can lay several scraps side-by-side to achieve the desired width.
Stack the rectangles into 5 stacks, 5 pieces in each stack. Stack pieces of different fabrics in each stack. Align all edges.

Take the first stack. With a ruler and rotary cutter, make 4 cuts through all 5 layers of the stack. You will get 5 smaller stacks with 5 pieces in each.
Mark them 1-2-3-4-5.

Now, you will need to mix and match pieces from these 5 small stacks to form the individual blocks:

Now sew the pieces of each block together with seam allowance 1/4". You'll get 5 blocks measuring 7 1/2" x 7 1/2".

Repeat for the other stacks.
For the quilt, you'll need a total of 25 blocks.
Lay out the blocks in 5 rows, 5 blocks in each row. Alternate the direction of the blocks in each row, as you can see in the diagram below:

Sew the blocks in rows, then sew the rows together.

Print out the templates of the Butterflies and position them on the top. When you are satisfied with your arrangement, start embroidering the applique butterflies one by one.


Embroider a couple of butterflies as 3D ornaments. They can add a charming accent to the finished quilt.
Now place the backing/lining on a flat surface (table) face down. Cover with batting. Spread your working piece over it.
Pin all three layers together with 1" safety pins. We quilted each block in parallel lines. Remove the pins while quilting.
Press the work with heavy steam.
If you want the quilt to have a regular shape, square the work -- all corners should be 90 degrees and opposite sides should be of the same length. Then finish the raw edges with binding.
If you prefer an irregular shape, as we did, with a rotary cutter, or scissors, cut away the protruding batting and backing, so that the edges of all 3 layers line up evenly.
Spread the remaining backing-binding fabric on your working table, face up. Spread the quilt over the fabric, face down. Pin the quilt and the fabric with 1" safety pins as if for further quilting, but not as densely.
Pin the edges together with sewing pins. With seam allowance 1/4" sew along the quilt's edges.
Remove the safety pins. Turn the work to have the backing fabric up. With scissors, neatly cut the fabric about 2" from the edges. Cut out along all edges. Press the seams.
Turn the binding to the back of the quilt. Press. Baste in place. Fold back the raw edges 1/4" and hand-stitch finish the edges.
This is a small segment of what the binding looks like from the back.

Position the 3D butterflies on the quilt and top-stitch them in place.

