This unique "hen-pillow" is a great Easter-themed project. Kids love it. It features the Easter Egg Cutwork Lace design embroidered as insert.

The finished size of the pillow is about 16" x 16".
We used:
Out of yellow batik, cut out a square measuring 17" x 17".
Print out the screenshot of the design. Place it in the lower right corner, about 2 1/2" - 3" from the lower and the right edges to mark the placement of the embroidery.

Make the embroidery of the egg as described in the instructions.

Out of pink batik, cut out a square measuring 9" x 9".

Fold this square along the diagonal, face inwards and press. With a graphic pencil draw scallops along the diagonal.

On your sewing machine, stitch along the scallop line.

Cut away the scallops with a seam allowance of 1/4". With small sharp scissors, notch the seam allowance on the curves. Turn right side out. Press.

Position the piece in the upper left corner of the embroidered piece. Align the edges. Pin.

Top-stitch the pink piece to the base 1/4" from the edge.

Position strips of trim, ribbons or lace across the pink piece, as shown. Pin in place. Topstitch.

Out of red felt, cut 2 pieces measuring about 3 1/2" x 4 1/2" and 2 pieces measuring about 3 1/2" x 3". Place the pieces face to face, align the edges. With a graphic pencil draw a comb on the 3 1/2" x 4 1/2" piece and a wattle on the 3 1/2" x 3" piece.

Out of yellow felt, cut 2 pieces measuring 3 1/2" x 3". Place them face to face. Draw a rectangle.

Topstitch along the lines. Trim to 1/4" seam.

Turn the right side out. Fill with stuffing. Baste the opening close.

Pin the beak about 1" from the upper left corner. Pin the beard about 2" lower. Pin the crown about 3" from the corner as shown.

Fold pieces of trim, ribbons or lace. Pin them about 1" from the upper right corner.

To make the back panel, out of yellow batik, cut 2 pieces measuring 17" x 11 1/2".
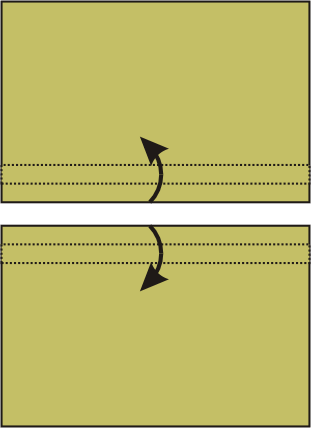
Place them on your working table face down. Working with one at a time, fold back 1" on one 17" long side and press. Fold back another 1" and press. Topstitch in place. Repeat for the second rectangle.

Place both rectangles face up so that the upper rectangle overlaps the lower one by 1".
Sew the Velcro tape to the overlapping edges of the rectangles: sew one half of the tape to the upper edge of the lower rectangle on the front of it; sew the second part of the tape to the lower edge of the upper rectagle on the back side of it. "Stick" both parts together to make one back panel.
Place the front panel on your working table, face up. Cover with the back panel, face down. Pin the edges of the front panel and back panels together.

Machine stitch with seam allowance about 3/8". Finish the raw edges with zig-zag.
Turn the case right side out.
Hand stitch the black button for an eye.

Insert a pillow form inside the case. The pillow is finished!
