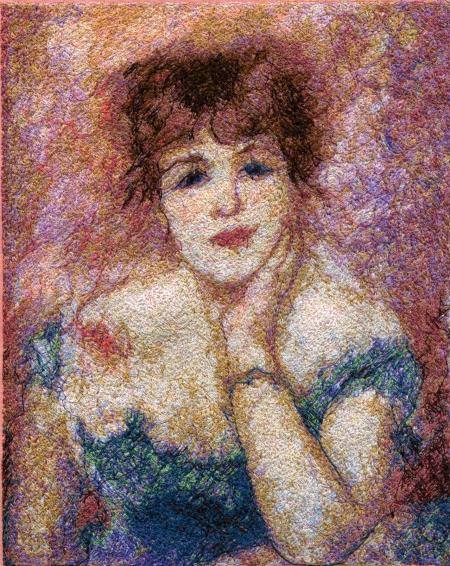
For this small, charming wall quilt, we used the embroidery design of Actress Jeanne Samary by Pierre-Auguste Renoir for the Commercial Hoop. The stitch-out for the Mega Hoop (6" x 8" ) can also work for this quilt.
The finished size of the quilt is about 16" x 20" (40 x 51 cm). |

|
Besides embroidery threads, you will need
- medium-weight iron-on cut-away stabilizer, or polyester craft felt used instead of stabilizer;
- a piece of light-colored cotton fabric for embroidery,
- strips of cotton fabrics (we used batiks) to match the colors of the embroidery (it's best to choose them after you have made the stitch-out),
- backing and batting,
- binding,
- quilting threads to match the fabrics,
- quilter's ruler and rotary cutter (or graphic pencil and sharp scissors).
|
| Emboridery |
Stabilize the light-colored piece of fabric with medium-weight iron-on cut-away stabilizer or polyester craft felt. Upload the design into the machine and embroider it. After the embroidery is finished trim it leaving 1/4" seam allowance beyond the embroidery margins.
|

|
Choosing Fabrics
|
Using the stitch-out, choose 12 fabrics to match the embroidery. 6 of the fabrics should be lighter and 6 should be darker. You will need only a small amount of each, so this is a great opportunity to raid your scrap stash. All strips we used are from 1 1/2" to 2 1/2" wide, and the longest is only 20". You can also sew several strips together to form long strips.
|
|
The Assembly of the Top
|
The quilt is a cabin block with the embroidery as the central part. We placed the lighter strips on the top and left sides of the portrait, and the darker fabrics on the bottom and right sides of the portrait.
|
|
On your board or work table, lay the out the embroidery and the fabric in the order you'd like to see them.
Out of the lighter fabrics, cut strips of the following sizes:
- 2" x 7 1/2"
- 2" x 12 1/2"
- 2" x 10"
- 2" x 16"
- 2 1/2" x 13 1/2"
- 2 1/2" x 20 1/2"
Out of the darker fabrics, cut strips of the following sizes:
- 1 1/2" x 11"
- 1 1/2" x 8 1/2"
- 2 1/2" x 13 1/2"
- 2 1/2" x 11 1/2"
- 2" x 18"
- 3" x 15 1/2"
Sew the 2" x 7 1/2" light strip to the upper edge of the stitch-out and press the seam.
|

|
| Sew the 1 1/2" x 11" dark strip to the right edge of the working piece and press the seam. |

|
Sew the 2" x 8 1/2" dark strip to the bottom of the working piece and press the seam.
|

|
| Sew the 2" x 12 1/2" light strip to the left edge and press the seam. |

|
The rest of the strips are attached in a similar way. Remember to press the seam after every strip is attached.
|
| Sew the 2" x 10" light strip to the top. |

|
| Sew the 2 1/2" x 14" dark strip to the right. |

|
| Sew the 2 1/2" x 12" dark strip to the bottom. |

|
| Sew the 2" x 16" light strip to the left. |

|
| Sew the 2 1/2" x 13 1/2" light strip to the top. |

|
| Sew the 2 1/2" x 18" dark strip to the right. |

|
| Sew the 3" x 15 1/2" dark strip to the bottom. |

|
| Sew the 2 1/2" x 20 1/2" light strip to the left. |

|
|
|
| Quilting and Finishing: |
Now place the backing on a flat surface (table) face down. Cover with batting. Spread your working piece over it.
Pin all three layers together with 1" pins and start quilting. Using the invisible thread, quilt through the embroidery - around the head and shoulders of the model. Then we quilted each strip in a free motion style with matching threads. |

|

|
After the quilting is finished, press the work with heavy steam and square the work -- all corners should be 90 degrees and opposite sides should be of the same length.
Finish the raw edges with the binding.
|
| Your quilt is ready. Enjoy! |

|
|
|
Enjoy!
|
|
Happy Stitching!
|
|
Back to Actress Jeanne Samary by Pierre-Auguste Renoire
|
Back to the Project Page
|
