Some points to remember from the General Guidelines:
Use Vilene water soluble stabilizer;
Use the same thread for the upper and bobbin to get two-sided embroidery.
DO NOT embroider several designs in one hoop.
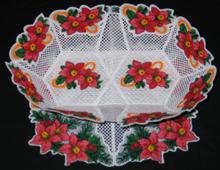
These are instructions on how to assemble the 3DPoinsettia Bowl, Doily and Bottle Apron Set from our catalog. Along with the embroidery files, you will get the color card, which will help you select the threads, and also sort out the many parts of the design.

Step One: To make the bowl, you'll have to embroider six bowl panels and the hexagon for the bottom. The bowl panel is #7 on the picture; the bowl bottom is #8 on the picture.
Use 2 layers of Vilene-type water-soluble stabilizer; use the same thread for both the needle and bobbin to get 2-sided embroidery. Rinse the stabilizer and leave to air dry.

Step Two: Press all parts with steam and sew them together with invisible thread. Read instructions on how to do this in our Guide to Assembling a Freestanding Bowl.

For the poinsettia flower you will need white, red and green organza. The parts of the flower are #3-6 in your color card.
Hoop 1-2 layers of Vilene with a layer of green organza and embroider the leaves (part #3). To make a red flower, hoop a layer of Vilene with red organza and embroider part #4 twice and part #5 once. If you want a white flower, use white organza. Part #6 is the flower center; embroider it with gold metallic thread.

When all parts of the flower are ready, rinse the stabilizer and leave to air dry. Do not press! After they are dry, cut away the excess organza and sew or glue all parts together to form a flower.

Decorate the bowl with the poinsettias.We placed 2 poinsettias on each panel.


To make the poinsettia doily, you'll have to embroider part #1 four times (the files are called Doily1, Doily2, Doily3, and Doily4 -- this is the same design but rotated to point in different directions) and part #9 twice. Use Vilene-type water-soluble stabilizer. For the doily, you can use white bobbin thread as it doesn't have to be two-sided.


Press with steam and stitch the parts together using invisible thread. Decorate with 3D poinsettias.

To make this bottle decoration, you'll have to embroider parts #10-15. Embroider each part once. Use Vilene-type water-soluble stabilizer. For the bottle vest, you can use white bobbin thread as it doesn't have to be two-sided.
Press with steam and stitch the parts together using invisible thread.
First stitch together parts 12 and 14, then do the same with parts 13 and 14.
Stitch part 10 between the parts 14 and 15.
Stitch part 11 (the bow) over part 10.
Stitch together the top edges of the parts 12 and 13.
Insert satin ribbons into the holes.

Decorate the vest with poinsettias. Put the vest onto a bottle.

3D poinsettias, set on a satin ribbon, can be used to decorate glasses.


Using part #2 and 3D poinsettias, you can make additional decorations for your table.

We hope that you like our poinsettia set and the many possibilities it offers. Enjoy!
 |
|
 |
|
 |
|